How to Use Neocities CLI to Update Your Neocities Site

Neocities is a free web hosting service that powers hundreds of thousands of websites. It began as a way to “rebuild the web we lost to automation and monotony, and make it fun again.” I’ve reviewed it in a previous article and thought it was a neat choice for hosting a personal website. It may not be for everyone, but users who want to create their website from the ground up may enjoy using it.
A lot of users manually update their pages using the few tools that Neocities provides. While that can work, updating the site manually can be a time-consuming process. This process can be improved using the Neocities CLI, a tool for updating multiple files of a website quickly.
If you use Neocities, this post will show you how to use its CLI to update your website. It will cover what to install, how to compile your website and the Neocities CLI commands to update your website.
Why Use the Neocities CLI?
Without the Neocities CLI, you will need to manually edit and upload content. This can be fine if you work on one page at a time, but doing multiple updates or any large updates can be time-consuming. The CLI can make the process more efficient.
Another reason why you would want to consider using the CLI is if you are making multiple changes but want to hold off on publishing them until you are ready. By making changes manually, each change you make directly on Neocities will go live the moment you save it. By using the Neocities CLI though, you can store the changes locally first and then push those changes at once afterward.
Prerequisites
Before beginning, you will need two things which are files for your website and Ruby.
This post assumes you have already created a website and have the files stored locally on your computer. If not, create a website in whatever way you wish. For this tutorial, I’ll use a static site generator called Jekyll and a theme called Mekyll to generate a site and upload its files to Neocities. However, you can use any static site generator (SSG) you want or none at all. If you are interested in choosing an SSG but unsure which one to pick, check out this guide I wrote on how to pick one.
You will also need to install Ruby, the programming language that the Neocities CLI was created in. See the documentation on the Ruby website on how to install it.
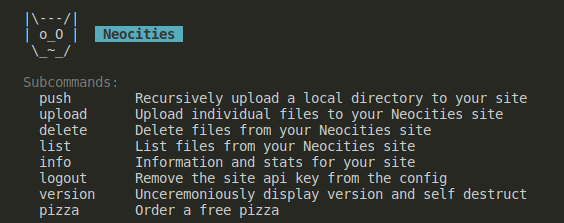
Install Neocities CLI
To begin, install the Neocities CLI. It’s a simple one-line command that you run in your terminal or command prompt.
gem install neocities
If the command requires elevated permissions, add sudo before it like so:
sudo gem install neocities

See this Neocities page for more details on this step.
Compile Your Website (If Necessary)
If you are not using a static site generator, this step may not be necessary. If you are using one, however, you will need to build your site first. In its current state, you just have a collection of separate files that can’t be used on their own. By building your site, the necessary files will be generated to create your website.

In my case where I am using Jekyll, I will use the following build command:
bundle exec jekyll build
The command you will use will depend on the SSG you are using.
If the website was successfully built, you will get a folder containing the output. In the case of Jekyll, the newly generated files will be located in a folder called _site. Once more, the output may differ depending on the SSG, but the content will be similar.

Preview Your Website
Alternatively, if I would like to build the site and preview it locally afterward, instead of using bundle exec jekyll build, I would run the serve command:
bundle exec jekyll serve
Again, the command you will use to do this will depend on your SSG. If you are not using an SSG, there are different methods available. For example, if you code using Visual Studio Code, you can install the Live Preview extension.

As you can see above, the site has been built and I can now preview it at the given address. It is a good idea to preview your website to check for mistakes and ensure everything looks good before uploading it.
Use the Neocities CLI to Upload Files
Navigate to Your Built Website’s Folder (If Necessary)
For the final step, we’ll use the Neocities CLI to upload our files to Neocities. If you use an SSG, you will need to navigate to where your built website is located. With Jekyll, they are located in the _site folder. To navigate to your published website folder, use the change directory (cd) command. With Jekyll, I would type cd _site in the terminal.

Push Your Changes
Now it’s time to upload your files. Use neocities push to upload your files. There are different ways to use the push command, but you will usually just use the neocities push command, which uploads the entire directory’s content. If you are curious though, here are the other push commands.
neocities push .: Recursively upload the current directory.neocities push -e node_modules -e secret.txt .: Exclude certain files from being pushed.node_modulesandsecret.txtare just examples and you can exclude any and as many files as you want.neocities push --no-gitignore .: Don’t use.gitignoreto exclude files.neocities push --dry-run.: Just show what would be uploaded. This provides a preview and nothing gets pushed.neocities push --prune .: Delete site files not in dir (be careful!).
Note: The ‘.’ means you want to push all of the content of the directory except the excluded files. If you would like to push only certain things, replace the ‘.’ with the files and folders you would like to push.
How to Get Your Neocities API Key
If it is your first time using the CLI, you may be prompted to log in. To log in, you will need your site’s name and your password. You may even need to enter an API key. To get your API key, on Neocities, click on “settings”, then click on “manage site settings” and click on the API tab. Keep this information secret as someone having access to it means they can update your site too.

Check the Status of Your Push
You will see the status of your updates. The Neocities CLI will upload new changes or files, skip files that have not been changed, and reject files if it is an unsupported file format or if there is another error.

Conclusion
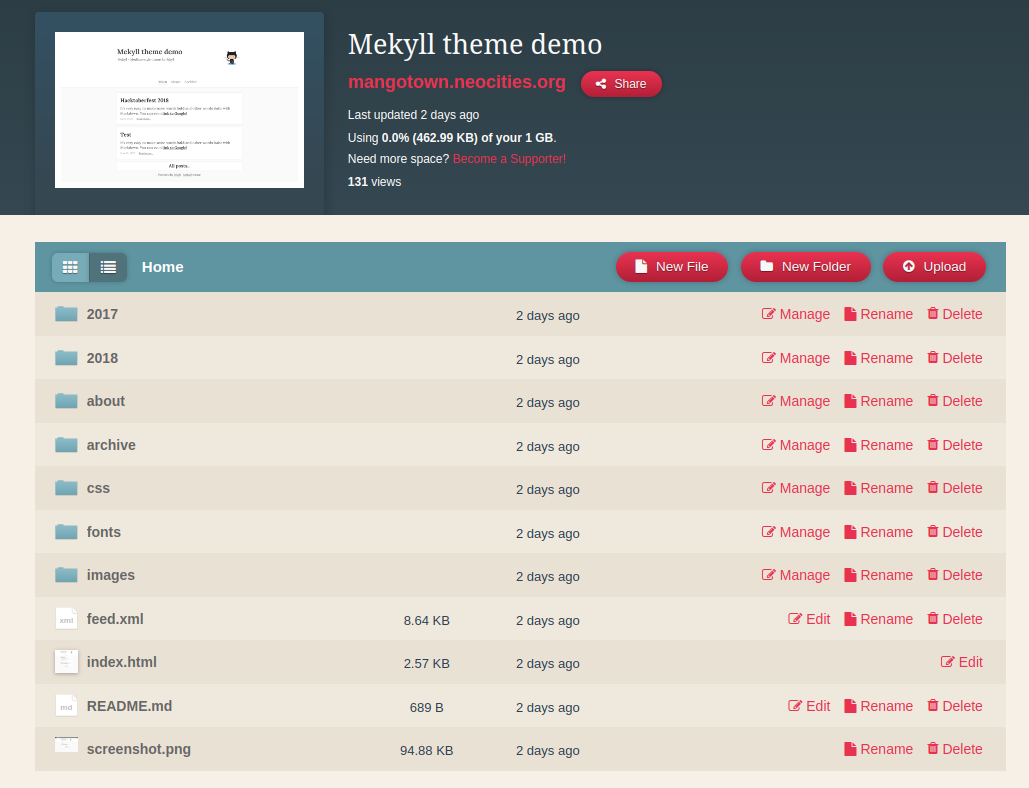
If things go correctly, you have successfully uploaded your website to Neocities and it can now be viewed by anyone. Your file manager page should display your uploaded files.
Now that you have the Neocities CLI set up. Whenever you make changes locally, you can hold on to those changes and then push them to your Neocities website when you are ready. The Neocities CLI also has other commands that you can use. For example, there is the upload command if you would like to upload certain files and not all files. This can come in handy if you are ready to upload changes to one page, but are still working on another. Overall, the Neocities CLI is a great tool that can improve your productivity and help you manage your website.